'Red Ring of Death' - Microsofts free gift to you for hard earned cash!!!
There I was happily blasting my friends on 'Modern Warfare 2' when the screen freezes, no problem I thought a quick power-off and I'll be back in the game. To my horror what I saw when I turned my beloved 360 back on was 3 blinking red lights, a quick 'google' had me pulling the rest of my hair out!! It turns out that due to poor cooling on the motherboard the processors for the graphics chip, cpu or both can get warped, therefore resulting in a system failure (3 red rings). The main culprat seems to be the 'X' clips on the back of the board holding the heat sinks in place. More reading and investigating I found a guy that suggested replacing the clips for a bolt on system. So with screwdriver in hand and 'NO WARRANTY' to fall back on, I proceeded to rip apart my xbox - I had nothing to lose and everything to gain if it worked.
Here's how I did it.....Oh please don't blame me if you try this and it don't work, so far I'm 3 for 3 units fixed using this method, however if you have a valid warranty I'd recommend you use that first.

Step 1
Just in case you wondered what the 3 rings look like, here is what every xbox owner dreads!!
Step 2 - Lets get the box apart - First Stand the box on its end and using your fingers pull at the top (front panel) it will with a liitle effort pop off.
Step 3 - Get yourself some tools (actually you should have got these first), the ones I found worked well are these from B&Q (DIY Store)
Click here for link to store
You will need the T9 star, 2.0 slotted and 3.0 slotted screwdrivers. Also a 1/4 socket (you'll see why later)
Step 4 - Remove the grey grills from either end. Using the 2.0 slotted driver poke the end through the holes in the casing to release the clips, if you look closely the case is marked indicating where the clips are. Then just lift carefully.
Step 5 - Seperate the main case. Place the box upside down to do this (ignore the first lot of photo's as they just show where the locking points are). You'll need a thin blade, or something similar to release the internal clips. There are 7 in total (see image below)
With the box upside down, push the blade in a slight downward motion, you will feel and hear the clips release with a 'clicking' sound, then just move from one end to the other releasing the clips and pulling the case apart.
Step 6 - Now turn the box so you can see the front, there are a few clips here, just use the slotted driver to ease these apart.
Step 7 - There are 6 star bolts that need to be removed to seperate the internal metal case (these are marked with red circles), the blue circles show the fixing points of the motherboard and will need to be removed either now or later. Use the T9 star driver to remove all screws.
Step 8 - Turn the unit over and remove the last part of the outer case, exposing the motherboard etc. Take care when removing the case, as the CD/DVD open/close button will catch on it.
Step 9 - Remove the DVD drive on the left, remembering to disconnect it from the mother board, two cables to remove.
Step 10 - Remove the cooling funnel, it sits at the back over the twin fans. Use a slotted driver to release catch and lift out.
Step 11 - Disconnect the power to the twin fans.
Step 12 - Remove the remaining screws on the back of case, these are 8 back star screws. You can throw these away as you will not need these to re-assemble the unit.
Step 13 - Turn unit right way up, and remove the clip/housing that covers the ring lights, its just a clip. Then remove the 3 black star screws and pull the circuit board towards you and off the unit.
Step 14 - Remove the motherboard and place upside down, then using the slotted screwdriver lever the 'X' clips off each pin holding the heat sync on.
Step 15 - With both heat syncs off, carefully clean the top of the processors and the underneath of the heat syncs of the grey thermal paste. The first image shows a typical sight with thermal paste all over the place.
Step 16 - Remove the 8 pins from the heat sync's (4 on each). Then stick washers onto the heat sync, I used a small dot of superglue to hold the washer in place. The shallow one will need a stack of two washers (so that's 8) so it will clear some of the components on the motherboard. The larger copper bottomed only needs one in each corner.
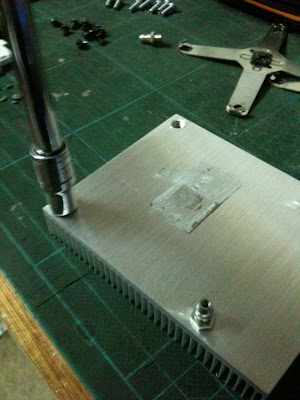
Step 17 - This bit is important, with all washers stuck in place, apply a small 4mm blob of thermal paste on the top of each processor, there are 3 in total, the smaller one just use a smaller blob of paste or it will spread all over the motherboard. The thermal paste can be aquired at any computer shop or online.
Step 18 - Now carefully hold the motherboard on its side and line, one at a time, the heat syncs up and using the screws (shown earlier) screw the heat sync's onto the motherboard.
Step 19 - Here's where we test to see if all the hard work was worth it. All you need to do is plug in the power and monitor/TV cables, you'll also need to push back on the small circuit board (light ring board), with all in place use your finger nail to push the center button on the light ring board, if your lucky your screen will show the xbox logo and boot logo, you can turn the unit off using the same button. If however like 2 of the units I've fixed the 3 red lights still show, leave it plugged in, the heat sync's will get very hot so be careful, hopefully after a few minutes it will screen will show the boot logo, if not leave for 5mins, then turn off, and start the xbox again. This has worked for me!!

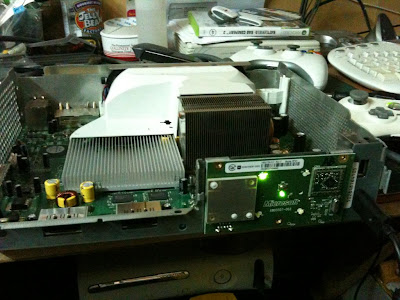
Once its working, just work backwards in assembling the unit, I tend to get it back as far as motherboard in case with fans connected and shroud inplace, then just turn it one and play for a few hours to test to make sure all is ok. Then when happy fully assemble and pat yourself on the back for not only fixing your dead xbox but also saving the overpriced fixing fee microsoft charge for a 30-45min job and a few pounds worth of parts.
Hope this tutorial helps you as much as this knowledge has helped me.